
Have you noticed tiny specks or grainy textures ruining a perfect photo? Photographers call this noise, and it can affect the quality of even a well-composed shot. Noise usually sneaks in when you’re shooting in low light, using high ISO settings, or editing images extensively. While it’s a common challenge in digital photography, understanding noise and how to manage it can elevate your photos.
This guide will explain what noise is, its causes, and how you can reduce or fix it. Plus, you’ll learn how to turn noise into a creative advantage.
Understanding Noise in Photography
What is Noise?
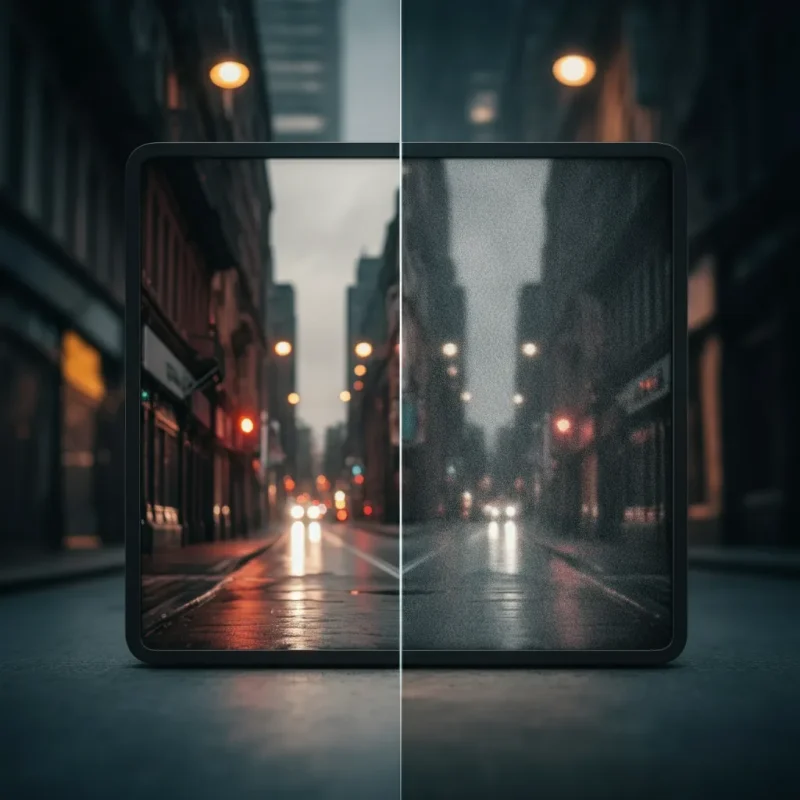
Noise in photography refers to random specks, graininess, or unwanted colors that distort an image, reducing its overall quality. It’s most noticeable in dark areas or low-light shots, giving the photo a cluttered appearance. Think of it as the visual equivalent of static on a radio or snowy interference on an old TV.
All cameras produce some level of noise, but the amount varies based on factors like your settings, environment, and equipment.
Types of Noise
Noise in photographs generally falls into two categories:
- Luminance Noise (Grainy Texture)
This type of noise appears as a gritty texture and impacts the brightness of pixels without affecting their color. Some people even compare it to the natural grain used in film photography.
Where you’ll see it: Often shows up in shadowy areas, clear skies, or flat backgrounds.
- Color Noise (Chrominance Noise)
Also called chrominance noise, it shows up as tiny, scattered red, green, or blue dots. This type of noise tends to be more distracting and gives the image an artificial feel.
Where you’ll see it: Most noticeable in low-light shots, underexposed areas, or when using high ISO settings.
What Causes Noise in Photos?
Noise doesn’t appear randomly—it’s usually the result of specific shooting conditions or choices. Understanding these causes can help you avoid it while shooting.
Common Causes of Noise
- High ISO Settings
Increasing your ISO boosts your camera’s light sensitivity, helping you capture brighter images in darker conditions. However, it comes at a cost, introducing more noise into the final shot.
Tip: Keep your ISO as low as possible without sacrificing proper exposure.
- Low Light Conditions
Shooting in dim environments forces your camera to work harder to pick up details, often resulting in noisy shadows.
Tip: Add external lights, use reflectors, or extend your exposure time to reduce noise.
- Small Camera Sensors
Cameras with smaller sensors, like smartphones and budget DSLRs, struggle in low light. They increase noise because of their limited ability to gather light.
Tip: Opt for cameras with larger sensors (e.g., full-frame or APS-C) for better performance.
- Long Exposure Times
Keeping the shutter open for longer durations can generate heat, leading to signal noise across the image. This is common in astrophotography and night photography.
Tip: Use long-exposure noise reduction features or take breaks between shots to cool the sensor.
- Underexposed Images and Excessive Editing
Brightening an underexposed photo during editing often reveals hidden noise, diminishing image quality.
Tip: Aim for correct exposure in-camera to reduce reliance on heavy edits.
How to Detect Noise in Your Photos
Noise can be subtle at first glance but becomes noticeable upon zooming or editing your images. Use the steps below to detect noise early.
- Zoom to 100% or More
Open your photo on a computer and zoom to 100% or higher. Focus on flat areas like skies, walls, or shadows where noise usually appears.
- Inspect Shadow Areas
Noise often creeps into darker portions of an image. Look for unwanted textures or colorful specks in these regions.
- Utilize Editing Tools
When adjusting exposure or brightness, pay attention to noise becoming more prominent. Use noise reduction tools to mitigate this.
How to Reduce Noise While Shooting
Minimizing noise begins with smart shooting techniques. Adjust your settings and equipment to capture cleaner, sharper images.
- Shoot with a Low ISO
Use the lowest ISO your camera allows to maintain image quality. Unless light is scarce, aim for ISO 100 or 200.
- Add More Light
Brighten your scene using natural light, a flash, or studio lighting. The better-lit your subject, the cleaner the result.
- Use a Tripod for Long Exposures
Lower your shutter speed without worrying about motion blur by stabilizing your camera on a tripod.
- Shoot in RAW
RAW files hold more image data than JPEGs, giving you better control during editing to fix noise while preserving details.
- Nail Your Exposure
Slightly overexposing (without losing highlights) prevents noise from creeping into shadows. Proper exposure reduces the need for heavy post-processing, which can amplify noise.
How to Fix Noise During Editing
Sometimes noise is inevitable, especially in low-light or high-ISO scenarios. Luckily, editing software offers effective tools for reducing noise:
- Lightroom or Adobe Camera Raw
Both have Luminance and Color Noise sliders in the Detail panel. Adjust these sliders gradually to target specific noise without softening the whole image.
- Photoshop Reduce Noise Filter
Navigate to Filter > Noise > Reduce Noise to fine-tune Strength, Preserve Details, and Reduce Color Noise for precise control.
- AI Noise Reduction Tools
Use advanced AI software like Topaz DeNoise AI or DxO PureRAW for targeted noise reduction without losing clarity.
- Focus Noise Reduction on Specific Areas
Mask tools in apps like Lightroom allow you to apply noise reduction only to problematic areas, like shadows, while preserving critical details elsewhere.
- Combine Noise Reduction with Sharpening
After reducing noise, your image may look soft. Use sharpening tools to restore clarity—but apply sparingly to avoid reintroducing artifacts.
When Noise Becomes Art
Not all noise is bad. Many photographers use noise as a creative choice to enhance aesthetics or evoke emotion.
- Create a Vintage Look
Grainy textures give photos a film-like appearance, making them feel timeless or nostalgic.
- Add Grit and Raw Emotion
Fine grain adds authenticity to genres like documentary or street photography, creating a storytelling element.
- Enhance Low-Light Atmosphere
Grain can amplify mood in night photography or dimly lit portraits, adding a layer of creativity to your work.
Never Fear Noise Again
Noise in photography doesn’t have to be your enemy. By understanding its causes and using smart shooting techniques and editing tools, you can control it to achieve stunning results. And when appropriate, you can even use noise to elevate your creative vision.
Remember, photography is all about experimenting and capturing moments authentically. Whether you’re keeping your images crisp or adding artistic grain, make every shot count.
Want to learn more expert photography tips? Check out our guides for shooting in low light and mastering exposure!