
Designing your own T-shirt is a hugely rewarding creative experience, especially with the powerful tools available in Adobe Illustrator. Whether you’re a total newbie looking to create your first design or a designer ready to refine your skills, this guide will walk you through how to design a T-shirt in Illustrator step by step. From setting up your workspace to adding creative graphics, you’ll learn everything you need to feel confident and bring your ideas to life.
By the end of this guide, you’ll not only understand the basics but also feel prepared to experiment with advanced techniques. Your perfect T-shirt design is just a few clicks away, so roll up your sleeves and get started.
Why Use Illustrator for T-Shirt Design?
Adobe Illustrator is a top choice for T-shirt design for one big reason: it’s vector-based. This means your designs will retain their crisp quality at any size, whether it’s on a small pocket tee or a billboard-sized graphic. Its range of tools allows for endless customization, letting your creativity take center stage.
Not sure where to start? Don’t worry! Follow this simple guide to learn how to use Illustrator like a pro.
Setting Up Your Workspace
Designing a T-shirt starts with the right setup. Your workspace and settings are the foundation for your creative process.
Choose the Right Artboard Size
The artboard represents the area where your design will come to life. When designing T-shirts, you’ll want to match your artboard size to the dimensions of the print area.
- Standard Full Front Print: Set your artboard to 12 x 16 inches.
- Small Logo or Chest Design: Opt for a smaller size like 5 x 5 inches.
Open Illustrator and click File > New. Set the width, height, and orientation based on the area you’re designing for. Keep your units set to inches for accuracy.
🎯 Pro Tip: Use a T-shirt template for guidance. You can download Illustrator-compatible templates that mimic T-shirt layouts to make positioning easier.
Set Up Bleeds and Margins
If your design prints to the edge of the shirt, you’ll need to include a bleed. A bleed is an extra margin that ensures no white edges appear during printing. Set a bleed of 0.125 inches (3mm) to give your design a safety zone.
To add this, enter the values when setting your artboard or access File > Document Setup > Bleed.
Choose the Proper Color Mode
This is a key step many overlook. For T-shirt printing, always use the CMYK (Cyan, Magenta, Yellow, Black) color mode. CMYK reflects the ink used for printing and ensures your colors will appear accurate on fabric.
You’ll find this option under File > Document Color Mode > CMYK Color.
Creating Your Design
Now that your workspace is set up, it’s time to start designing!
Adding Shapes and Graphics
Shapes are the building blocks of great T-shirt designs. Circles, rectangles, and freeform shapes can be transformed into eye-catching graphics.
Drawing a Perfect Circle
To create a perfect circle, grab the Ellipse Tool (shortcut L) from the toolbar. Hold Shift while dragging to maintain even proportions. If you want precision, click on the artboard and enter exact dimensions (e.g., 150 x 150 px).
🎯 Pro Tip: Perfect circles are great for logos or as background elements behind text.
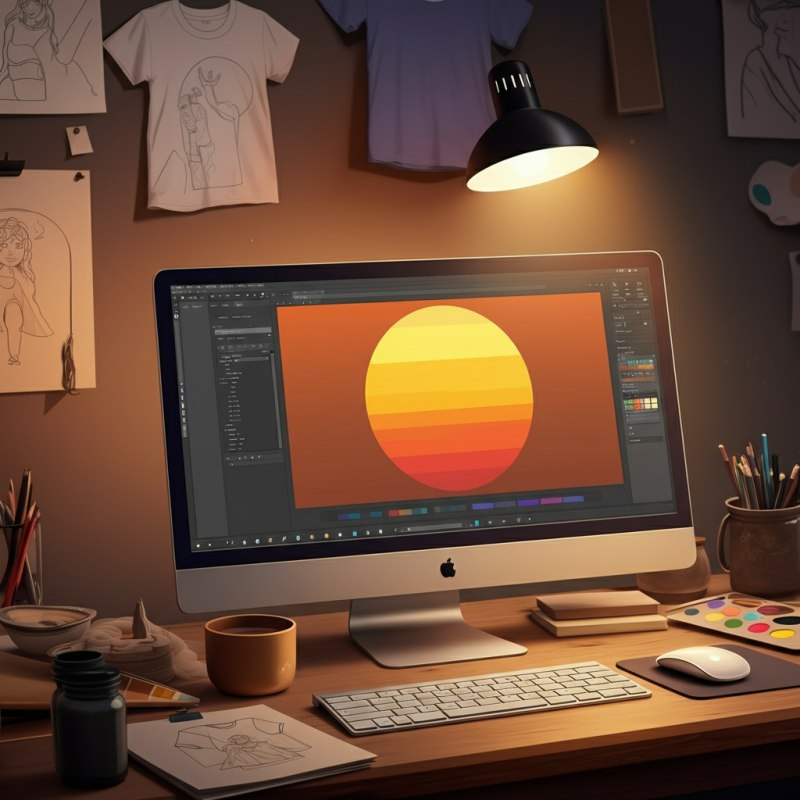
Applying Gradients
Want to make your design pop? Gradients add depth and personality. After creating a shape, select the Gradient Tool (shortcut G) from the toolbar. A default gradient will appear, which you can customize in the Gradient Panel under Window > Gradient.
For example, create a glowing sun effect by setting the gradient stops to a bright yellow (#FFEB0A) and orange (#FF4500). Drag and adjust the colors to perfect the transition.
🎯 Pro Tip: Gradients can be radial (like sunlight) or linear (for a sleek and modern edge).
Adding Text
Text is a common feature in T-shirt designs. Whether it’s a bold statement or a subtle logo, Illustrator gives you full control.
- Select the Type Tool (shortcut T).
- Click on the artboard where you want to place the text and start typing.
- Use the Character Panel (under Window > Type > Character) to adjust the font, size, spacing, and alignment.
🎯 Pro Tip: Stick to 2-3 complementary fonts to keep your design cohesive. Use bold fonts for headlines and script fonts for accents.
Working with Layers
Layers will keep your design organized, especially if it’s complex. Access the Layers Panel under Window > Layers. Use separate layers for each design element (shapes, text, etc.) to make editing easier.
🎯 Pro Tip: Lock layers that aren’t being modified to prevent accidental edits.
Final Touches
Before you call your design complete, follow these steps to ensure it’s ready for printing.
Add Final Adjustments
- Align Your Design: Use the Align Panel to center elements on your artboard.
- Simplify Shapes: Use the Pathfinder Tool to combine or simplify shapes within your design.
- Double-Check Your Colors: Ensure all colors are in CMYK for accurate printing.
Save in the Right Format
To send your design to a printer, save it in a print-ready format.
- Go to File > Save As and select PDF if your printer prefers it or EPS for vector compatibility.
- If specifics are required (like transparent backgrounds), export as PNG under File > Export > Export As.
T-Shirt Design Tips for Success
- Focus on Simplicity: Overloading your design with details can result in a cluttered look. Go for clean and impactful.
- Experiment with Colors: Play around with color combinations, but test them on different color backgrounds to see how they pop.
- Test Print Before Finalizing: Always print a sample to ensure the design translates well from screen to fabric.
Start Creating T-Shirt Designs That Turn Heads
Designing a T-shirt in Illustrator is a skill that improves with practice. By following this guide, you now have a complete roadmap to creating unique, professional-quality designs. With the right setup, creativity, and attention to detail, your designs will be ready to showcase or sell in no time.
Feeling inspired but need a little extra help? Adobe Illustrator can seem intimidating at first, but don’t worry! Keep experimenting with its tools, and soon you’ll find yourself mastering both the basics and advanced techniques.
Now go ahead, open Illustrator, and start creating your dream T-shirt designs today!