
What is layer and clipping mask Photoshop?
Since clipping masks are a tool that permits you to control layers, let’s start by studying what layers are in Photoshop.
Visualize you have a written photo or a piece of paper. If you place a sheet of see-through paper on top, you can create new things without altering anything on the original. Layers can work the same way in Photoshop.
There are different types of layers:
- Rasterized layers are the ones that cover pixels -an example of a rasterized layer is a photo.
- Imageries can also act like smart objects – which is a different version of the layer.
- There are some vector layers, such as the ones covering shapes or text.
- And lastly, there are adjustment layers.
Each layer can cooperate with the other layers in different ways. You can alter the combination mode or enhance different masks to do so. All of these tools permit you to work on an image non-destructively.
What does a layer-clipping mask do?
A clipping mask relations one or more layers composed rendering to its content and slide.
All the clipping mask layers are connected to the base layer of the clipping mask. The layer that is “clipped” to is called the base layer. Recall that this is only sometimes the bottom-most layer of the whole document. The base layer of a clipping mask must be highlighted to evade misperception when waged with other layers in Photoshop.
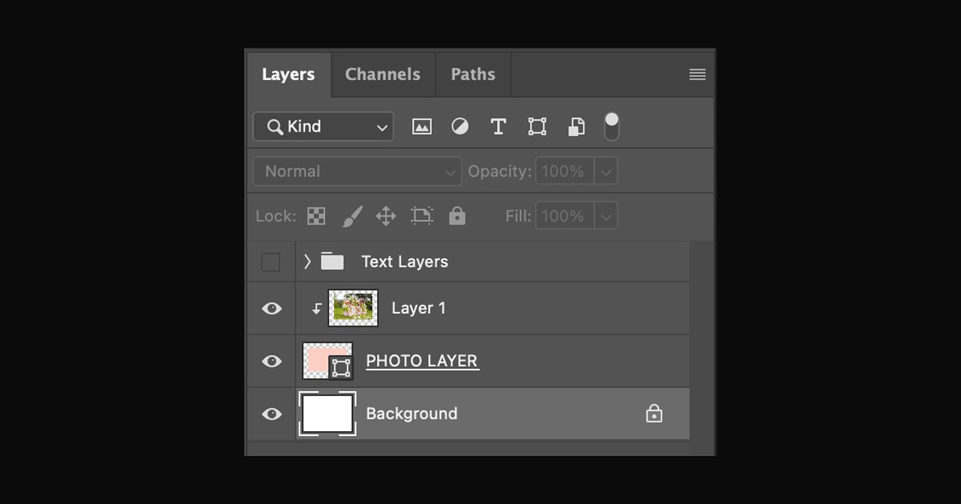
Another thing to recollect is that only some of the layers overhead the base layer of the clipping mask will be pretentious – only the ones fitting to the clipping mask. To classify these layers, you will see that they are depressed and have a down arrow/clipping mask icon next to them.
How To Use Clipping Masks in Photoshop
Do you hunger to study how to use clipping masks in Photoshop, or do you wonder how you can complete your Photoshop editing? If your answer is yes, you have come to the right place!
Clipping masks permit you to link two layers together. For example, you can create a shape or text and then attach a photo to fit within the strictures of that shape or text. This may sound complex, but it’s not! You can apply a clipping mask to select brand changes to a single document layer.
Keep interpretation, and you will understand how informal and obliging clipping masks can be.
What Would Be An Advantage To Using A Clipping Mask Instead Of A Layer Mask?
When a layer mask is additional, a small black dot seems on the left side of the thumbnail to designate that a layer mask is related to that layer.
You can put down between the layer and the layer mask to see how your cover oversees affecting the layer. Swipe right on the thumbnail if you want to change the layer mask instead of the clipping mask. The layer thumbnail develops noticeably and is on; the little black dot appears to the right of the thumbnail. This creates the coating, instead of the layer mask, lively so you can edit your sketch.
A layer and its mask are linked by default. If you want to resize or change the layer mask, you can unlink them.
Using the Invert Mask action, you can disclose the hidden parts and hide the noticeable features in one step.
You have more than one way of covering; either smear a mask to the whole layer or use the Lasso tool hand-picked and then generate a show from that selection.
What is the advantage of clipping the mask?
- Well, in many cases, this would be good enough, but other times you’ll prefer to mask those pixels rather than delete them. Clipping masks are used to hide zones of a layer based on pre-made collections or paths. Usually speaking, layer masks deliver more control over a single layer’s pixels.
One of the vague ideas that often journeys new users is the change between a layer mask and a clipping mask. They behave likewise but should be used for dissimilar drives. In Photoshop, we use different tools and methods to mask different effects. One is a clipping mask, and the other is a layer mask.
This leader will cover the fundamentals of both layer masks & clipping masks through representative how you might use them in practical projects. Both should be valuable at different times, and if you want to principal Photoshop, you’ll need to comprehend these vital changes.
It is all about accurate selection and rapidly choosing the correct part. Different tactics are obtainable to make the proper selection informally, so the tiny particulars of the piece stay distinct and detached. We have to select the controlling layers and establish them properly. We do not mean to oversee the image as a whole, so we reflect to edit part of it or exact areas. In such cases, adobe has progressive topographies which allow you to make selections easily without stress. Once you pull out the layer on the other, you must have a clear mind about making the vagaries so that you may accomplish the desired results quickly.
To do all the belongings correctly, we need to make the selections accurately and then establish all the layers to realize desired results. A layer may border or inhabit the other layer, so it must be done correctly. The belongings may get multifaceted when you are tired of attaining somewhat extraordinary. There are several topographies in Photoshop that provision clipping and removing images. You must be aware of properly using these topographies to achieve nearly everything likely finished in these Photoshop landscapes. These landscapes confirm that no changes in the excellence of photos are made, and the superiority of the picture does not get pretentious.
HOW TO CREATE A CLIPPING MASK
There are numerous habits to generate layer clipping masks in Photoshop. They can give you the same result, so select the calmest method. Remember that you will need at least two layers, or none of these techniques will affect your text.
Method 1.
- First, you have to Hold down the “Alt” key.
- Then, hover over the line that divides the layers on the Layers panel.
- When you notice that cursor variations into the clipping mask icon, fast-click the left button on your mouse or touchpad.
Method 2.
- In the Layers panel, you must place the layer you need to clip on top of the layer you poverty to “clip” it to.
- Then, you need to click right on the top layer.
- It will show a menu.
- Scroll down the menu pending you find the “Create Clipping Mask” option, with click on it.

Method 3.
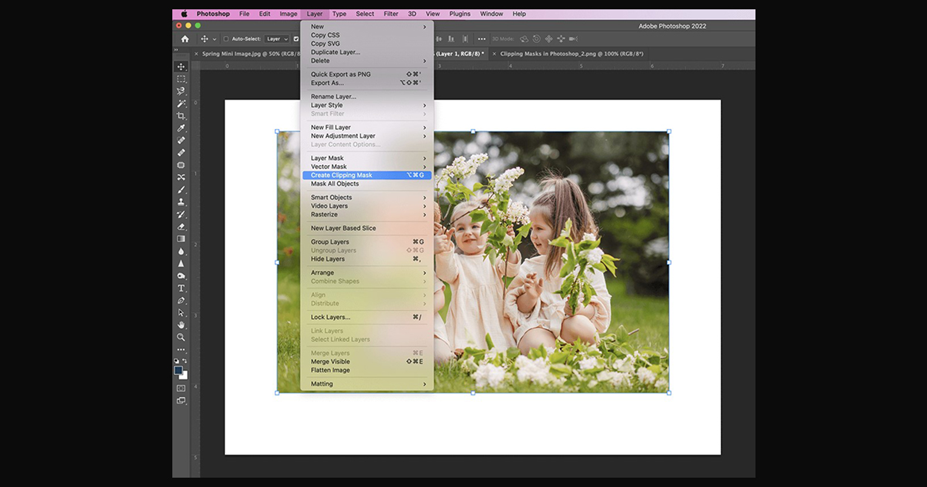
- Go to the Layers menu in the top of the screen and open it.
- Find out “Create Clipping Mask” option and next click on it.
Method 4.
You need to create a clipping mask using a keyboard shortcut: “Ctrl + Alt + G.”
USING A CLIPPING MASK WITH MULTIPLE LAYERS
Clipping masks effort with additional one layer. The only law is that the layers must be next to each other. The example will be, if there are four layers – you have to set the bottom-most layer as the base of the cutting mask and comprise layers 2,3,4
Consequently, your bottom-most layer is the base of the clipping mask and only contains layers two to four. If layer three is not comprised, layer four won’t be gifted to be consistent with the clipping mask either.
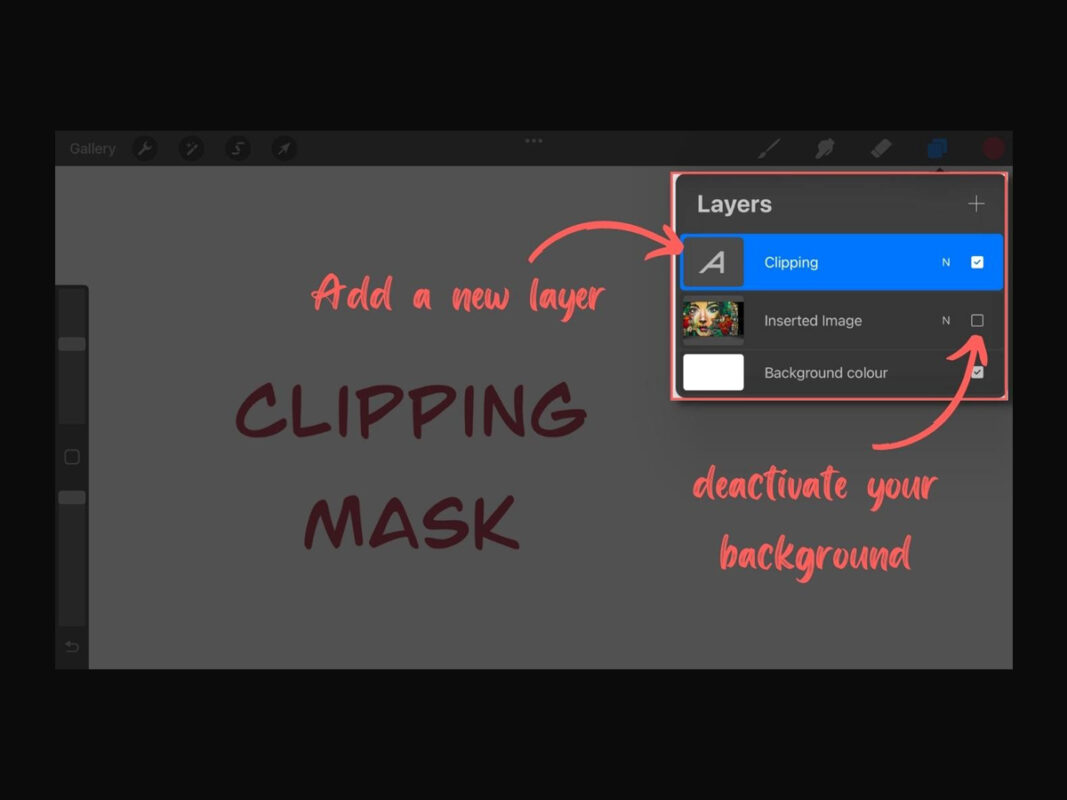
If you add a new layer INSIDE the clipping mask layers, it will automatically be involved as part of the clipping mask. However, if you create a new layer at the HIGHEST of your layers – it will NOT be comprised as part of the clipping mask. The same goes for additional layers that are added in the base layer of the clipping mask – they won’t be contained.
You can comprise new layers at any time using the four methods before being labeled in the section “How to Create a Clipping Mask.”

Last words
Clipping masks permit you to hide portions of an image, but these masks are created using multiple layers, whereas layer masks only use a single layer. Not only clipping masks be created from conditions, but they can also be applied to vector and text objects.
In many cases, this would be fine, but other times you’ll prefer to mask those pixels instead of deleting them. Generally speaking, layer masks provide more control over a single layer’s pixels. Clipping masks hide areas of a layer based on pre-made selections or paths.
Moreover, Layer masks are one of Adobe Photoshop’s most useful features. Photoshop software mastery begins with grasping the power of layer masks.
A layer mask controls a layer’s transparency. Layer masks use a single act applied to a single image and allow hiding portions of a layer while exposing other layers positioned underneath. This is performed by adjusting the layer’s transparency and opacity through a mask.
It can only have monochromatic colors in grayscale between white and black and various shades of grey.